Monday, November 15, 2021

Kotlin - Getting Started With Scripting


CONTEXT


So Kotlin is picking up nicely, and has been doing well. Mainly starting as some sort of alternative to Java by targeting the JVM making it interoperable with Java. So Java developers can move to Kotlin slowly, they don't have to migrate to Kotlin right away. The other great thing about Kotlin is the fact that you can compile it to Javascript making it target Javascript nicely and finally Kotlin can run natively. So this makes Kotlin a very powerful language.


It's really great, I mean Google has made it an official Android Development language, so this means we have an alternative to Java when working with Android Apps. Further more Gradle has picked up on Kotlin as an alternative to Groovy. We now also have KMM ( Kotlin Multiplatform Mobile ) so this makes it fit into the Flutter and Ionic where you can develop an App for both iOS and Android using Kotlin. So you write once and then compile for both platforms.


So I see Kotlin as the new Groovy language. So another thing about Kotlin is that you can use it as a Scripting Language. So yes, you can replace your Bash & Python scripts especially for more complex operations you want to run. Bash is can be hard to read and maintain. Python is great plus it's an interpreted language meaning you don't need to compile it like Kotlin Scripts. Just know that there's an alternative to Python / Groovy / Bash / Typescript and many other scripting languages.


So out of the box if you have set up Kotlin, you can already run the .kts files using the command kotlinc -script YourScript.kts <args>. The pain point here is that Kotlin will always have to compile the script and packaging into a .jar before running the script you intended to run.


It would be nice to have some small framework or enhancements to the existing Kotlin Scripting Engine that can help us cache these compiled scripts and make it more portable so that we don't always to go through that step mentioned above. That's why I would like to introduce you to KScript, enhancements made to the existing Kotlin Script Engine written by Holger Brandl.
  • Caching of the compiled jar files so that when you run the same script without changing the script
  • Dependencies uses the power of maven to pull some custom and third party dependencies.
  • Sourcing / Inclusion of other Kotlin Scripts.

So obviously these features are not news for people who have worked with other scripting languages, but it's good to note some of the features included.


GETTING STARTED

In order to get started you will need the following tools up and running on your machine :

  • Kotlin because it's the core language of you scripting in this case.
  • Maven because one of the nice features with Kotlin is that you can pull in dependencies.
  • Kscript which is the underlying Kotlin scripting enhancements framework.

I don't know about you but, I set up my environment using SDK Man! It's simple like that you can check it out on the net or look at my article, Managing Multiple Sotware Development Kits Using SDK Man! article


INSTALLING KOTLIN

At the time I am writing this article, the latest version is 1.5.31 so here goes :

sdk install kotlin 1.5.31


INSTALLING MAVEN

If you don't already have maven then : 


sdk install maven 3.8.2


INSTALLING KSCRIPT / KOTLIN SCRIPT

If you don't already have maven then : 


sdk install kscript 3.1.0


TEST DRIVE


QUICK SCRIPT

Open up your favourite IDE or text editor and let's write some Kotlin to test drive it.


#!/usr/bin/env kscript
/** * @author: Thabo Lebogang Matjuda * @since: 2021-05-23 * @email: <a href="mailto:tl.matjuda@gmail.com">Personal GMail</a> */ // Variables section here. val scriptUser = args[0] val functionMessage = getMessageText( scriptUser) // Print out some results println( functionMessage) /** * Takes a String value as an argument and returns text. * This returned text is a string interpolated message with your argument. */ fun getMessageText( callerName: String): String { return "Hello there $callerName" }


And there you have it. The first line is standard with some scripting languages like Bash, we just pointing out the which engine this script should use in this case it's the kscript engine Kscript expects a standard args collection just like with Java's public static void man (String[] args) {} method. So we are just pulling one parameter at index zero which Just like Java. I included a function getMessageText in here just to showcase that we can do that in the script file. As you can see if we also have string interpolation where we don't have to concatenate the parameter $callerName. The function takes in a String parameter and also returns a string, there's some TypeScript looking syntax there as well. Really nothing fancy here. 


TESTING THE SCRIPT

Go ahead on your terminal and run it like you would run a PowerShell or Bash script :


./ITTestDrive.kts Thabo


I saved my script as ITTestDrive.kts so you can save yours as anything you want. Nothing hectic there. Also notice that I am running mine with my name as the parameter. Another way or running the script is : 


kscript /where/ever/your/script/IsPlaced.kts
# For Example with our case kscript ITTestDrive.kts Thabo


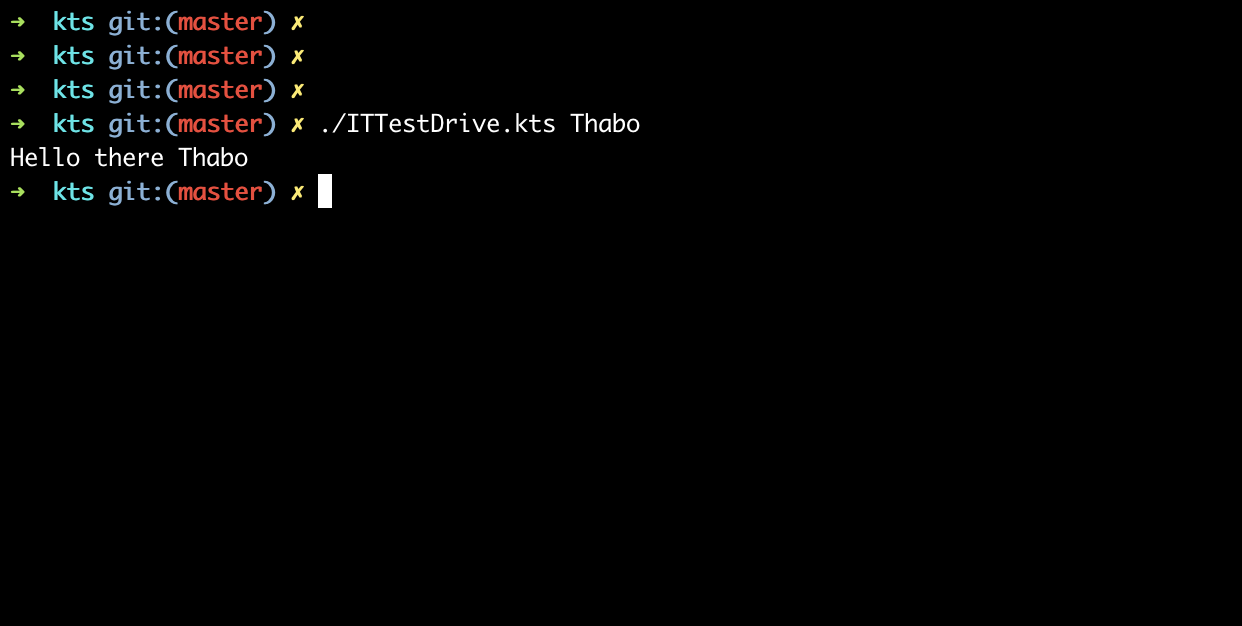
Kscript Execution Example


So execute your script and you will notice that the first run is taking a bit long and that's because your script is being compiled and packaged into an executable .jar file. If you run the same script again without changing the code then it will be faster because now your script has been compiled before and Kscript can see that there are no new changes, meaning it does not need to re-compile your script. So now you wonder where this compiled .jar is saved, well in that case check a folder ${HOME}/.kscript inside your home directory, that being. You will then notice a jar file in there. That's your new script! If you wish to clean up on these cached file from time to time you can use the command :


# Clearing the Kscript Cache
kscript --clear-cache


You can see now how all this works, unlike Python and Bash, you can see there's a drawback of compilation time, if this compilation does not bother you then go for the Kscript and have fun. 


Kscript Cache


CONCLUSION

That's it! Well done you have written your first Kotlin Script and yea, may be we can look into more Kotlin Goodies in the future and have some more fun. Let me know what you think, Cheers!


Spring Boot App As A Unix Service ( Systemd )


CONTEXT

When thinking of the modern way of delivering software then tools like Docker & Kubernetes come into mind. If you are in the open source world working with languages like Java where you can package your entire web application into a .jar file and then that can later be “Dockerized“ aka “Containerized“.


This is all good and there are hordes of documentation and articles that support that this is great, but what happens when you are in the space where docker is not “in yet“? You have this .jar application but cannot really containerize it because the infrastructure is not there yet.


In this article we will be learning about an alternative, which is to install your “Containerizatble“ application as a Unix Service using Systemd.


ASSUMPTIONS

  • You have a packaged app, in .jar format.
  • This packaged app is executable.
  • Your target Linux server has java installed.
  • Your target Linux server has systemd installed and enabled. ( this is mostly a standard now with most Linux Distros )


GETTING DOWN TO IT

So then let’s go for it, the main thing here is the Unit & Service definition which will be configured inside a .service file. This .service file should be placed inside the systemd default folder : /etc/systemd/system. Let’s go ahead and create a service file, you can can name it whatever you want, I prefer to give it the same name as my actual app or something close but, to show that you don’t need to keep it the same, I will have the names different. 


Let’s have a look at some of the elements in my case. My app file name is tpserve-1.0.0.jar and I created a .service file named toob-serve.service. These files are in the path /root/toob. Let’s have a look the following image. 


My Linux Service Files


SERVICE FILE

You can either create the .service file directly inside the /etc/systemd/system folder or create it somewhere else then copy it over when you are done. I chose to create is somewhere else then copy it later to the /etc/systemd/system directory. So let’s look at my simple .service file and evaluate what's happening. In my case I have : 


Systemd Service Configuration


For copying purposes : 


[Unit]
Description=TOOB Services
After=syslog.target

[Service]
User=root
ExecStart=/root/toob/tpserve-1.0.0.jar
SuccessExitStatus=143

Restart=always
RestartSec=5

[Install]
WantedBy=multi-user.target


[UNIT] 

Description is used to describe the unit that will be executing this service. In my case you can see there I just have “TOOB Services” then we can later see easily in the logs that this unit will be referred to as “TOOB Services” this makes it easy to know which service you are looking at.


After is mainly to start that it must start of the the syslog.target which is part of the core OS processes that kick in when the machine boots up. So it’s just a safer way of making sure we boot up after the more important OS processes.


[SERVICE] 

User tells us more about the user we want to use when running this service. Generally it’s good and more secure to create a specific app user and assign that user to run the app. In my case I am just using root to showcase systemd services in Linux.


ExecStart runs the target service that we want to bootstrap and manage using systemd. In my case I want to execute my .jar app. So you can use this ExecStart to run any app you want to run. It even be a bash script if you like. Anything that’s executable that is. Another important thing to note is that I am using absolute paths because systemd only works with absolute paths.


SuccessExitStatus takes a list of exit status definitions that, when returned by the main service process, will be considered successful termination, for example : 


 SuccessExitStatus=1 2 8 SIGKILL


… ensures that exit codes 1, 2, 8 and the termination signal SIGKILL are considered clean service terminations. Also not really required for a basic Service Config! 


Restart yes we want our service to restart if anything has happened. So this is a nice way of restarting without manual interaction. So it’s cool if if the database service went down for like 3 seconds. 


RestartSec is all about how long we should before we automatically restart. That’s all there is to it. 


[INSTALL] 

WantedBy tells systemd that this service should be started as part of normal system start-up, whether or not a local GUI is active. There’s really no dependency on the OS UI loading. 


INSTALLING SERVICE 

We now have our service configuration done in the .service file and are ready to install it and manage it using systemd. To install it let’s copy our .service to /etc/systemd/system, in my case I am copying my toob-serve.service file : 


Service Installation


SERVICE RELOAD

We have installed this service but systemd does not know about because it does not automatically reload new services, unless may be you restart the OS. So we have to reload / refresh the systemd daemon. To reload or refresh it run : 


 sudo systemctl daemon-reload


Let’s also enable the service one shot : 

 sudo systemctl toob-serve


SERVICE STATUS CHECK

Now that we have installed the service and reloaded, systemd knows about it. We can verify that the service has been installed by running the status check :


 sudo systemctl toob-serve


Systemd Service Status Check


Notice that I didn’t have to specify the .service part this is because systemd now knows about it and can tell that we are referring to that file. You will also notice that we can refer to our service easily in the logs by looking at the description that we defined, “TOOB Services“. So at this stage we know that :

  • Our service is installed

  • Our service is enabled

  • Our service is currently not running, so it’s inactive (dead)

Happiness so far and we can continue with the next steps. 


SERVICE START

Let’s give our system a kick start and check it out : 

 sudo systemctl start toob-serve


SERVICE LOGS CHECK

If you have configured your logs directory inside your app then you can also verify by checking the file wherever you have configured it. Otherwise another case is that you have not configured your app to create a separate log file so then if we haven't configured anything special, our Spring Boot application should write its logs to stdout. Now also keep in mind that our application is now running as a daemon, which means that we aren't able to view the stdout of the application anymore. This is where a utility like JourneyCtl comes in. 


We can check the logs using history check : 

 journalctl -u toob-serve

The command from above will drop us into a view with which we'll be able to view all the logs of the application since it has been deployed, with various options for filtering and more.


Or we can tail live logs, similar to tail -f this can be achieved with : 

We can check the logs using history check : 

 journalctl -u toob-serve -f

Now this command will help us with with info about the last log lines written by our application, it will also monitor the new log lines to come.


JournalCtl Logs


So there you have it. The main thing is now complete. You know how to install your Spring Boot app as a Linux service using systemd. We are not done as yet, let’s look at the last bits and pieces, like how to stop your service or even two birds with one stone where you can run a restart which will stop and start once.


SERVICE STOP

To stop your service you can run : 

 sudo systemctl stop toob-serve


Systemd Service Stop


As simple as that, your service will be stopped and you can spot it by the defined description as shown in the image above.


SERVICE RESTART

Yes, you guessed it, to restart your service you just need to : 

 sudo systemctl restart toob-serve


SERVICE UNINSTALL

So you now want to uninstall your service, at this point you need to use a couple of commands. I prefer doing it in a certain order to make sure that things are done properly. My flow of things would be to first stop the service with the systemd stop command. Then I would disable it, which is the opposite of enabling it like we did in the article earlier, something like : 


 sudo systemctl disable toob-serve


I would then remove the .services file and then perform a services reload like we did earlier and you should have a hint on the console that the service has been removed : 


Systemd Removed Service Log


CONCLUSION

That’s all I have for you on setting up your Spring Boot app as a linux service using systemd. This is not the only one I have learned that some Linux Distros like Ubuntu come with Upstart. And that that systemd is more of a successor to System V. And there are a few more, so we were just learning about systemd. If you are curious about more systemdservice configuration options you can check out this exhaustive list of them here. I hope this helps you out. 


Let me know what you think, let’s also discuss more to learn more. Cheers!