Monday, February 14, 2022

Jenkins : Changing Port Number


CONTEXT

Most services that get installed on your machine usually tend to use the the 8080 port as their default. Even when you develop a Web App, the default port is mostly 8080 unless you go and configure it to be something else. Jenkins is just one of those apps that use the port 8080 is the default.

So let’s do a quick run on changing the port number to something you would prefer especially if you missed this the first time when you were setting up Jenkins on the server.


LINUX OS

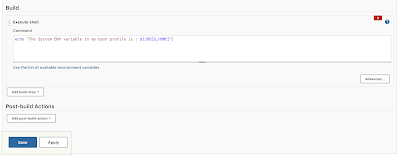
Look for the main Jenkins Profile, file on the server. Mostly in the path : /etc/default/jenkins and use your favourite text editor to change an Environment Variable in that file.


Change Jenkins Port : Linux OS


Change that port number to the new number that you intend to use from now on and then you can save your changes. Remember that you must restart Jenkins.


MAC OS

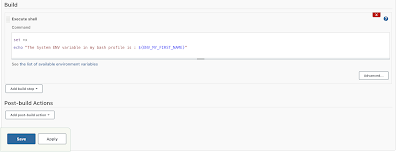
The way you installed Jenkins on Mac OS plays a huge role on this one. In my case I have installed Jenkins using Homebrew Package manager. I chose to believe that you have installed it the same way. Is that’s the case then look for a Mac OS system process file. This file extension should be ending in ..plist. The path is : /usr/local/Cellar/jenkins-lts/${jenkins-version}/homebrew.mxcl.jenkins-lts.plist .


NB : Pay close attention to this path above and replace ${jenkins-version} with your target version.


Use your favourite text editor to change the port number as show in the image below :


Change Jenkins Port : Mac OS


You will notice that I changed my port number to 8001 for fun. So you go for it as well and then save your changes and remember to restart.


CONCLUSION

It’s always the little things that matter the most in the world. I hope this was helpful and you will find it useful as you are working with tools like Jenkins. Cheers!


Jenkins : Making Jenkins Run Using An Alternative Username


CONTEXT

I was once bothered big time by Jenkins and this thing of running in some sort of a context of its own. Given that it was running under its own user name and had it’s own Maven Repo and many more things I could not run a Maven build on some Libraries for one of the organisations I was consulting at.


PROBLEM

So I would SSH into the Linux server and try to run a Maven build and that would work but, as soon as I try automate the same in Jenkins, then I would have problems. It’s as if Jenkins was an alien on that server. I don’t know if it’s a normal thing for you as well but, it was really frustrating.

But hey, at the same time I was just finding my way around Jenkins. So after some time I learned about a few Jenkins directories. Let’s try sort that out and see if it will help you.


SOLUTION

So one of the several solutions is to try and change the user around Jenkins. Remember that out of the box and the moment Jenkins is running as as user, “jenkins” So you are probably running as “root” or some other username that’s not jenkins.

Assuming that you running as root let’s use the root example.

Mainly you need to assign specific jenkins directories to your username, in this case “root” or whatever user you want to assign this to which is probably safer, security wise. So let’s change the following directories as follows :


  • sudo chown -R root:root /var/lib/jenkins
  • sudo chown -R root:root /var/cache/jenkins
  • sudo chown -R root:root /var/log/jenkins


Once you are done you need to change the username that jenkins is using to your preferred one, in our case we are using “root”. Using a text editor of your choice look for the main Jenkins Profile, file at, /etc/default/jenkins open it and change the 


Jenkins Username Variable


As you can see, I have commented out the original JENKINS_USER=$NAME of which Jenkins was picking up it’s own username, which makes sense. I have also replaced this with our context username, “root”

The last thing you need to do is make sure that you save your changed and then restart your Jenkins. After all this you should be able to automate a few tasks that you could not automate given the whole username issue and Jenkins running inside its own world.


CONCLUSION

I hope this was helpful and you will find it useful as you are working with tools like Jenkins. Don’t be frustrated anymore hey. Just have more fun with these Software Toys! Cheers!


Jenkins : Enabling Unix Alias Recognition


CONTEXT

So you you are on a UNIX system and you want to work with some Aliases in your shell execution but, you hit some issues. This is because it appears that mostly Jenkins has this disabled for some reason. Remember that Jenkins runs in its own sort of context under its own “jenkins” user.

Today we are going to look at some more Unix goodies. So we are going to check out the “Shopt BuiltIn” which is a tool that allows you to make some modifications to the optional behaviour of shell. So you can switch On & Off or Toggle some values of the configurations that have an effect on the Shell behaviour.


PROBLEM TO SOLVE


PROBLEM

Let’s configure a small Jenkins Job that will have an alias and try to use that alias. This is so that we can see the problem in action to make it more clear on the issue we are solving.


Jenkins Job With Alias Problem


So we have a Jenkins Job where we have our own alias named : simple_text_printout of which we also try to use in the line that follows. Now let’s see what happens when we run this Job.


Actual Jenkins Job With Alias Error


As you can see. We have an issue with the Job. Jenkins is telling us that “command not found”. So let’s check a way of trying to solve this using the “Shell Options”“shopt” command.


SOLUTION

We want to basically change the shell behaviour so that it has the aliases toggled on. This is what we meant by changing the shell behaviour. Let’s go through the Shopt Web Manual. You will notice that to get started you need the shopt flag or indicator or command. The second thing we need to do is enable the behaviour. You will notice that you need -s to [ Enable ] and -u to [ Disable ] so this is very important. The last piece to add is to specify the behaviour we want to modify. In this case we want to enable or expand aliases so we will go for the expand_aliases behaviour identifier.

Finally in full we have shopt -s expand_aliases . Add that into your Jenkins job, save your Job and try running it again.


Enabling Aliases Behaviour On Jenkins Job


Results After Changing Job


 Jenkins is now happy. You can explore more on this shopt tool.


CONCLUSION

I hope this was helpful and you will find it useful as you are working with tools like Jenkins or even in general, may be there are some Unix distributions that don’t have this out of the box and you would like to have this behaviour.


Saturday, January 15, 2022

Jenkins : Making Job Console Logs Less Verbose


CONTEXT

Jenkins prints out commands as they happen, mostly on Unix and this can be annoying if you don’t want a lot of Jenkins console logs, especially if they are just more like duplicates of your commands. This is an automatic out of the box behaviour. There’s a way we can tell Jenkins to instruct the machine to turn off these verbose duplicate commands.


SETTING UP THE INSTRUCTION


COMMAND CONTEXT

To achieve this, we can look into the Unix Bash’s Set -x and Set +x commands. So setting the “x” mainly instructs Bash to perform extra duplicate print out of commands as they are being run or executed. See this is another useful way of debugging your Bash scripts if you want to know the statements that are being executed and also the order they are being executed.

To toggle this on and off one can do any of the following :

  • On the command line via the Set -x or Set +x command to enable or disable the printouts.
  • Via the “Shabang” line in your script by appending the -x or +x .

Now the confusing thing is that the commands work the opposite way, i.e. the -x is to enable while the +x is to disable the printouts. So this is just a note right there. You can try these commands in your Bash terminal and scripts, I am going to just jump into Jenkins since that’s the point of this article.


WRITING THE JENKINS SCRIPT

In my previous Jenkins article Jenkins : Importing Your Custom Environment Variables I had a Jenkins job that ran and we can use that to showcase the Set -x and +x commands. Looking at the image :


Jenkins Annoying Duplicate Echos


You will see the highlighted line in a purple block. This is the annoying line I would want to get rid of. At the moment my Job Script is as follows : 


Script Before Disabling The Command Echos


This is before we use the set command to disable the echos, now let’s change the script to disable the echos.

As mentioned this can be done in two way, we can use the “Shabang” line at once with some like : #!/bin/bash +x


Script Updates To Disable The Command Echos Using Shabang


Or you can just use the Set +x command :


Script Updates To Disable The Command Echos Using Set Command
 

Either way you will get the same effect. The only difference is that using the shabang line makes sure the echos are off before running any line in you script while the set command will have the echos until the set command is executed. That’s all.


TESTING IT OUT

Run your Job and you will spot that the the annoying “echo” line we had before is now gone. You may refer to my results below : 


Script After Disabling The Command Echos


CONCLUSION

And there you have it, you now see one of the many possible ways of disabling the duplicate command echos as they are being executed. I hope this is yet another helpful tip to disabling the command echos as they happen. Let me know what you think, Cheers!


Jenkins : Importing Your Custom Environment Variables


CONTEXT

You are working on Jenkins and you want setup and work with some of your own custom Environment Variables and you discover that Jenkins cannot pickup your machine environment variables. Today we are going to look at how you can load your own custom variables that you want to use inside your Jenkins Scope.


GETTING STARTED

Start by creating a new Job that just prints out the value from any of your machine environment variables, I have JBOSS_HOME. You will notice that the value from your machine environment variable did not print. So it’s not you it’s just the behaviour of Jenkins. 


echo 'The System ENV variable in my bash profile is : ${JBOSS_HOME}"


Simple Jenkins Print Out Shot


I am guessing that’s why there’s a reason we have a special plugin we can use.


INSTALLING THE PLUGIN

Head over to the plugins section of Jenkins Manage Jenkins > Plugin Manager and search for the plugin named "Environment Intjector"


Environment Injector Plugin Installation


Restart Jenkins when the installation is complete and then let’s configure the variables next. 


CONFIGURING YOUR CUSTOM VARIABLES

Now that the plugin is installed we can start configuring it. In our current case we want to add a random simple Environment Variable and then we will print it out. To do start by heading to the configurations section in Jenkins as follows : Manage Jenkins > Configure System


Manage System Configurations


Once you are on the Configuration page then, look for the heading or section, “Global properties”. You will notice a check box labelled, “Prepare jobs environment”. Check that box where a text box will show at the bottom labelled, “Properties File Path”.


Things to note well here are :

  • One more thing to note very well is that the text box label states clearly that it expects a .properties file path. This means that you must create a .properties file which will be the one that contains your variables.
  • The path you specify must be an absolute path, you cannot use the your OS short cuts like ~/ and ${HOME}/ . so for example I have a path named tools/jenkins/jenkins-environment.properties in my home directory


So modify your .properties file and add a key = value par line with a key and value of your choice, I have my first name in the file as follows : ENV_MY_FIRST_NAME = Thabo which I will be printing in Jenkins shortly.

The next thing is to configure the text box path to where your file is : /Path/to/your/environment/file.properties


Jenkins Environment Variables File Configuration


Click the “Apply” and then the “Save” buttons. The last thing to do now it to restart Jenkins so that it becomes aware of the new Environment Variables.


CREATING / UPDATING THE JOB TO USE THE CUSTOM VARIABLE

So now we have configured all we wanted to configure. Let’s look into creating or updating a Job that will perform a simple variable printout, that’s all. So remember that my key = value pair is : ENV_MY_FIRST_NAME = Thabo so this means that I can now reference the key of the value I want to use. Check out my Job Shell Script below :


echo 'The System ENV variable in my bash profile is : ${ENV_MY_FIRST_NAME}"


Jenkins Shell Referencing Custom Environment Variable


Click the “Apply” and then the “Save” buttons.


TESTING IT OUT

The moment we have been waiting for, you may now run your Job and checkout the console logs. Checkout the image below for my results :


Jenkins Environment Variable Printing Results


CONCLUSION

This is how you can configure Jenkins to use your own custom environment variables. I hope this is useful to your Jenkins usage. Let me know what you think. Cheers!