Thursday, October 14, 2021

Managing Multiple Sotware Development Kits Using SDK Man!


Background

I once wrote a Java Shell Script that switches among the Java versions on my machine. The nice thing is that it worked well. Even shared it across the dev team and it worked like a charm. The pain come when I wanted to do the same with other tools ... i.e Maven; Kotlin; Kscript; Groovy & Gradle to name a few.

This would require regular maintenance on the script which would at some point require more and more time, while one needs to take care of real software development matters. I spend a lot of time on Unix based OS like working on Mac OS and you find that the organisation is hosting on Linux OS so I needed something that could work for both, something more flexible.

After some research I then learned about SDK Man! Which simply means Software Development Kit Manager.


What is SDK Man?

As hinted above this is Software Development Kit Manager. This tool helps with management of various tools in a simpler, cleaner and central place. One can manage all this in a parallel manner. As a company you will not have to worry about setting a standard from scratch. Think of standards like paths and directories. One developer saves their maven in folder x/y/z and the other one is /a/b/c ... now this could be hard to maintain and support. SDK Man will sort out all this in one directory out of the box.


Why Was SDK Man Introduced?

As a developer you deal with a lot of versions of one tool or you deal with various tools at once. Switching versions of the same tool and getting up and running with a different tool take up a lot of time and SDK Man was made to relieve you from all that effort. Things like setting up your JAVA_HOME path or GROOVY_HOME path can be quite an exercise. At times you find that one projects uses Java 8 and another one uses Java 14 and switching between the two requires a little bit more work. You either write a script to do that for you or you work with some like jEnv ( Java Environment ) , but as the name suggests, this is only for Java. Imagine if you could do this for other SDKs!


Getting Started.

For Windows OS can use Cygwin then for Unix platforms to install SDK Man is easy. For Windows OS I would rather use something else instead of SDK Man so tune into my next article coming soon! So start up your terminal to get started. Type the command : 


# Command to download SDK Man
curl -s "https://get.sdkman.io" | bash


SDK Man Installation Results


The screenshot above gives you an idea of how things should be. And that's simple as that. Take note of the dependencies that SDK man is looking for before installing.

We can run a few checks to see if SDK Man is really installed. Let's check the SDK Man version by running the command :


# Checking SDK Man Version
sdk version


SDK Man Version Check


The Actual Works

So now that SDK Man has been installed let check out how it works. We will go through a few short cases. 


  • We want to see all supported candidates in SDK Man to see what is offers.

    # Checking All Supported Candidates aka SDKs
    sdk list


    SDK Man Supported Candidates or SDKs


  • So now you have spotted something you want to install and want to check the versions first before installation. In my case I will pick maven. So let's see what versions are there :

    # Checking All Candidate Versions ( Maven in this case )
    sdk list maven


Supported Maven Versions On SDK Man

SDK Man is giving us a guide on which maven is installed on my machine. It's also showing what we wanted to see, which is all version supported on SDK Man. We also get to see which maven verion is in use on my mahine. So this is a good guide when working with a tool like SDK Man and multiple version of the same tool, in this case maven.


  • I have now decided that I want to install maven 3.8.2 and I install it as follows:

    # Checking All Candidate Versions ( Maven in this case )
    sdk install maven 3.8.2


    SDK Man, Maven Installation


Yes, it's correct that SDK Man asks you if you want to make the version you have just installed, the main one. So SDK Man has spotted that there are more than one versions of Maven installed and is asking if I want use the one I have just installed as the main one. I will chose "No" so that we can do that later.


  • Let's see all the maven sdks I have SDK Man, Maven Installation
    # List Maven Versions
    sdk list maven


    SDK Man, Maven List

We can see all the installed maven SDKs on the machine from the image above. I am using maven 3.8.1 on the machine and I have also installed 3.8.2. So let's see how to set a new version for the terminal session only or on the entire machine permanently. 


  • Setting maven in the current active terminal session. So in other ways we are setting it, temporarily :

    # Temporarily set maven
    sdk use maven 3.8.2


    SDK Use Maven ${Version}


  • Setting maven permanently, so this will not be in the current termianl session only :

    # Permanently set maven
    sdk default maven 3.8.2


SDK Default Maven ${Version}


  • So you want to be explicit when checking the current maven that's beng used :

    # Check current version in use
    sdk current maven


    SDK Current Maven

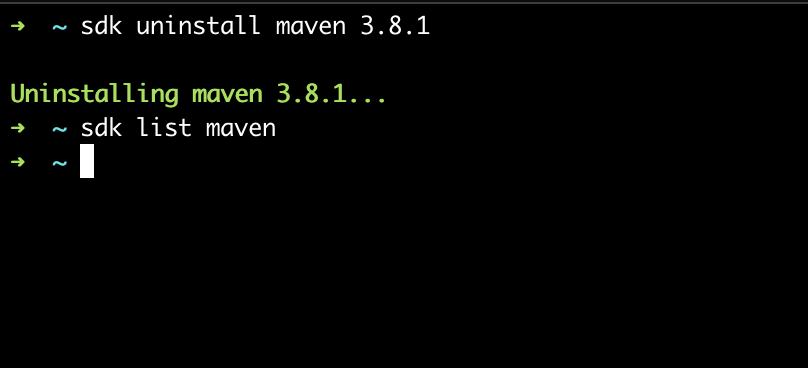
  • Now you decide that you are no longer using the older version of Maven so you want to remove it :

    # Check current version in use
    sdk uninstall maven 3.8.1


    SDK Uninstall Maven

Well done to you, now you understand SDK Man! You are wondering how you can point your IDE to these SDKs because so far you have just been using the terminal. So close up this article with that. So if you go to your home directory /Users/${yourname}/.sdkman aka ${HOME}/.sdkman, then you will find the SDK Man folders in there. So you want to use a specific JDK for your Java project, then look into the "candidates" folder because that's where all the SDKs are.


SDKs Home


So you can choose the version that you want, as shown in the image below.


IntelliJ IDEA IDE Using SDK Man Java


I hope you have enjoyed this article and this will help you. Leave comments in the section below and let me know your thoughts. Thanks!


Thursday, November 12, 2020

Bash It Out : Getting & Setting Values In A Properties Config File


Background


There are time developers get to a point where they need some sort of process automation on their machines. This can be anything you can think of. The solution often leads to a collection of scripts that nee to be developed for various operations. I was recently in such a case, where I had to work on the some scripts to assist the team with setting up certain components of a particular system. One of the processes which was interesting to me was to Get & Set configurations from a Java Properties file.

So, of course one could use Java ( which is heavy-wight ), given the config file we are were working wtih, there are also verious Java based scripting languages like Jython / Groovy / Kotlin Script etc ... In my case I wroked with plain old Unix Shell. I promise you it was fun. I really enjoyed it.
 
How about we get down the steps of how I achieved this. So we are just going to implement a way to Read "Get" and also how to Write "Set" some configuration values into a .properties file


Assumptions / Things To Keep In Mind 

So in this case we assume you have some base Shell Scripting experience. Meaning by now you know you can create functions and aliases and variables, you know how to import other scripts from other directories.


What You Need

You need your favourite text editing tool with some base bash /shell plugins or extensions. Nothing major really. Then you can use your terminal for testing purposes. No magic there. 


Getting On With It

So I am now going to get started with the "Get" part first and then we can move to the "Set", before you start, just create a properties file with some configurations for testing purposes. I named mine, "sample-conf.properties" and the contents of the file are as follows : 


some.conf.welcome.message = Believe it or not, I have been read from a shell script
some.conf.bashitout = Let's BASH it


Create a new script file and give it a name you prefer, i.e. mine is "properties-file.sh"


"GET" ting Config Values

Great, so now we have our configuration file and would like to get the configurations by their keys as shown in the images above. Let's look at the function we have for this operation.


# Used to extract the value of a specified key with the intention of reading from a ".properties" file.
# Usage : getProp this.property.key /from/this/file/here.properties
function getProp() {
propToRead=$1
propFilePath=$2

# While we read each file line
while read -r lineItem;
do

# Skip the line that have been commented out, all lines that start with the [ # ]
[[
"$lineItem" =~ ^#.*$ ]] && continue

# Check if the current line that we are on, matches the start of the property we want to read.
# If they starting of the strings match then we know this is the config we are looking for.
# If it's what we are looking for then we cut the line string at the point of the [ = ] character.
# After cutting the string into two parts, we take the second part which is the value we are looking for
if [[ $lineItem == $propToRead* ]]; then
configVal=$(echo $lineItem | cut -d'=' -f2)
echo $(trimText $configVal)
fi
done < "$propFilePath" # The file we are reading each line from
}


Cooooool stuff! So let's take a closer look at this function to learn about what's happening as much as possible.


  • The first two lines in the function are all about assigning the parameters or arguments to variables with proper names, for more understanding.
  • We then use the While Loop to go through each file line. We are simply saying that while we read each line from a file, then do certain things. The variable that represents a line is the lineItem. So keep that in mind.
  • The first thing we do in our while loop is to use regex to ignore comments. This means that the lines that start with the # character should be ignored. This is because lines starting with this character are comments. So then we say that if the current line we are at is a comment, then continue to the next line and leave this one as is.
  • Then we start building up on finding the value for the key that the client supplied. This build up is taking place in our if statement. This build up is based on a condition where the current lineItem matches the start of the key supplied by client, thus notice the * character after our variable propToRead. So we are saying that if the line we are on, starts with the given key then start finding the value of that key. 
  • At configVal=$(echo $lineItem | cut -d'=' -f2) We find the value of the key by first cutting / splitting / splicing the line by the "equals" = delimeter. This will cut the string into two pieces. We care about the second piece, which is the value. To cut the string we are using the Unix Cut Command which we perform on the lineItem we are at then we assign the result into a new variable, configVal that's local to the if statement.
  • Great, so there are chances that the value we are getting may need to be sanitized a bit, just to get rid of leading and trailing spaces. So for this one I wrote a little function which I will share in this artice.
  • Finally we return the value via the echo command.
  • The last line closes the while loop and also indicates what we were looping through. In this case the path of the file we were reading. Lookup some While loop basics using Unix Shell.


"SET" ting Config Values

Moving onto the next step, which is to set / update the configuration values by supplying a key. We will include something extra special where we insert a new records of "key" and "value". In the event we learn that the config is not in the file then we will insert or add one, based on the given arguments. 


# Used to modify a ".properties" file.
# This function will add the key if it does not exist
# Usage : setProp this.assumed.key "withThisNewValue' /inside/this/config/file.properties
function setProp() {
keyToAddOrModify=$1
valueToSet=$2
propFilePath=$3

# Check if the property exists in the file first
# Using Regex to ignore the lines that have been commented out.
if ! grep -R "^[#]*\s*${keyToAddOrModify} = .*" $propFilePath > /dev/null; then
logInfo $PROPERITES_FILE_SCRIPT_NAME "Property '${keyToAddOrModify}' not found, so we are adding it in."
echo "$keyToAddOrModify = $valueToSet" >> $propFilePath
else
# Handling a case where we have found out that the config exists so now it's a matter of editing its value
logInfo $PROPERITES_FILE_SCRIPT_NAME "Updating the property KEY : '${keyToAddOrModify}' and setting it to VALUE ${valueToSet}: in the file."
sed -ir "s/^[#]*\s*${keyToAddOrModify} = .*/$keyToAddOrModify = $valueToSet/" $propFilePath
fi
}

 
Zooming in closer to learn what's going on in the code. 


  • We are getting the three expected arguments and giving them meaningful names to understand more and to make the code more readable.
  • We then use the grep command to grab certain keys combined with some regex ( ^[#]*\s* ) that ignores configurations that have been commented out because we are not interested in them. On top of that we specify the file we want to read from at : $propFilePath > /dev/null. This line explained in short pretty much stipulates that we want to grab the configuration key and value that has not been commented out in the specified file.
  • The nice thing to add onto this is that we putting this whole statement into an if statement because we can evaluate if what we are grabbing is not there or not, notice the last part that checks for non-null value out of this statment at
    /dev/null and finally the negation with the ! mark. So let's revise it in simple english. If whatever I am looking for in this file is not there, then execute what's inside the if statement block. When executing the block then, we first print out to the user notifying them that we are did not find the specified config so then we are going to add it it into the file. The last line in the if then joins the "key" and "value" to format it properly like the .properties standards : "$keyToAddOrModify = $valueToSet" and finally we push that into the specified file path : >> $propFilePath and wrap it up there.
  • The second part of the if statement then executes in the case where we found the config from the file. So we use an almost similar regex together with a Sed command ( s/^[#]*\s* ) to avoid commented configurations and rather find the actual visible configuration. So the part of the Sed command that looks for the configuration only is the following : sed -ir "s/^[#]*\s*${keyToAddOrModify} = .* then the rest of the line is simply replacing the configuration in the file using : $keyToAddOrModify = $valueToSet/" $propFilePath.  


So there you have it! Now let's run a sample test to see how it behaves, then we are done.


Testing It Out

Open your terminal and then change to the directory where the script file is. For example :

 
cd /where/your/script/is/

Now import the script using the source command.

 
source properties-file.sh


You are doing great, now the next step is to start by the simpler one, getting a configuration.


getProp some.conf.welcome.message /where/your/configuration/file/is/sample-conf.properties


The results you should now be seeing on our terminal shoudl be something like : 


$ Believe it or not, I have been read from a shell script


Now let's set some fresh configurations. So while you are in the same directory and you have your script imported into your terminal session, now type somethign like :


setProp some.conf.bashitout "This is a Fresh Configuration, YEAH"
/where/your/configuration/file/is/sample-conf.properties


And you should have something like this : 


[INFO] 2020-11-12 22:07:48 [properties-file.sh] : Updating the property KEY : 'some.conf.bashitout' and setting it to VALUE This is a Fresh Configuration, YEAH: in the file


Also check your configuration file and is should have updated : 


And that's mainly it. If you want then you can try setting a configuration that's not in the file to see how it behaves, that test should insert a new record into the file. Anyway, this is how you Get and Set configurations inside a .properties file. I believe that one can use this same technique to play with other config files. 


You can refer to my GitHub Source Code to help you refer on what you may have missed. Leave your comments in the section below.