Thursday, October 14, 2021

Managing Multiple Sotware Development Kits Using Scoop On Windows


Background


I think we can see this is part two of the article I wrote, Managing Multiple Software Development Kits Using SDK Man!. Even though one can set up SDK Man on Windows OS, it's a bit more involved compared to setting it up on a Unix based OS out of the box. I mentioned that one would need to work with Cygwin, with the link specified in that article. So please note I am not saying it's impossible, I would just like to share something that I think can be easier on Windows OS. 

So as you know there are various package managers to managing OS packages and SDKs, i.e. Homebrew & Macports for Mac OS, Apt-Get on some Linux Distros. With Winnows OS it is a bit tricky but, I love the idea that there's something that was inspired by Homebrew for Mac OS which is called Scoop

Scoop allows one to manage Tools, Software Development Kits and Packages. Please read up on my previous article I wrote and mentioned above, it will give you an idea on what I am trying to highlight in this article. I this article it's more about Windows OS.


Let's Get Started!

To setup Scoop you will need Powershell 5 and later, I am using Powershell 7. Open up your Powershell terminal to install Scoop, with the following command : 

# Installing Scoop
Invoke-Expression (New-Object System.Net.WebClient).DownloadString('https://get.scoop.sh')


Scoop Installation


As shown in the image above, an indication that Scoop has been installed successfully. At times you may get an error especially if it's the first time you are using Powershell on that machine. I think some permissions need to be enabled since they are disabled out the box. If you try running the installation command as shown above and you get an error then run the following command to enable Powershell

# Permissions to enable Powershell
Set-ExecutionPolicy RemoteSigned -scope CurrentUser
 
So that's it, you have setup Scoop on your machine! 


Down To Work

To setup Scoop you will need Powershell 5 and later. Open up your Powershell terminal to install Scoop, with the following command : 
 

  • You have installed Scoop and there are no SDKs or packages installed. So you can check that out by  running :

    # List installed SDKs / Tools / Packages
    scoop list
     

Scoop List


  • Now you want to install something like Gradle. Double check first that you don't have Gradle on your machine :

    # Check Gradle version
    gradle -version
     

Gradle Version


  • You are happy that Gradle is not installed and want to now install it, so because you want the latest version of Gradle you don't specify the version in your command, also noted that depending on your internet speed this may be either quick or slow. Scoop will try to download your Gradle and also work on extracting it. 

    # Check Gradle version
    scoop install gradle


Scoop Gradle Installation


Yay! Gradle installed successfully, notice we are now dealing with version 7.2, which is the latest at the time of this article. 
 
 
  • Now you can run two commands to validate that Gradle is really installed. You can run the same gradle -version command we ran above or run a scoop command to list installed Gradles on your machine.

    # List Installed Gradles On Machine
    scoop list gradle


Scoop List Gradle


  • Say you don't want the latest Gradle because you inherited a project that uses an earlier version 6.9. Then you would do it this way by specifying the version after the "@" symbol.

    # Install Specific Version Of Gradle
    scoop install gradle@6.9

Scoop Install Specific Gradle Version


  • The installation is done and your current version is set to Gradle 7.2 if you run the gradle -version or gradle -v command. At this point you are ready to use Gradle 6.9 so let's change the machine gradle version.

    # Set Specific Gradle Version
    scoop reset gradle@6.9

Scoop Setting Specific Gradle Version


Gradle Version Validation


You can see that your version has now changed. Meaning the "reset" command worked. So it's an easy way of switching across multiple versions of the same tool or SDK.

 
  • You want to run a check on versions intalled on your machine just to be clear.

    # Get Info On Gradle On The Machine
    scoop info gradle


Scoop Info Gradle


  • Now you feel that the latest version is of Gradle ( 7.2 ) is not necessary at this point and you would like to remove it. So at the moment there's a ticket GitHub #3733 logged to add this feature. Something that's much like the "reset" with specified version. At the moment you will have to remove the version manually in your scoop directory. These directories are similar to SDK Man folders, there are minor differences with regards to the structure and folder names and yes, you spotted the folder names in the info command screenshot above. To verify that Gradle 7.2 is gone you can just try to switch to it via Scoop

    # Get Info On Gradle On The Machine
    scoop reset gradle@7.2


    Scoop Reset To Removed Version

 
There you have it. Checking the Gradle version should give you 6.9 now since you recently reset to it and then you removed 7.2. Let's keep a close eye to see if this "uninstall" will be added soon.


Above & Beyond

Scoop is a powerful tool that brings that Homebrew feel to Windows OS. There's more you can do with it than manging SDK. You can download add Curl you can add Git plugings like with have with ZShell's Oh My ZSH! for Unix platforms. You can add SSH to you machine for quick SSH Commands on your Powershell window and many more. 
 
Also note that just like in the previous article, you now know where the folders are and can point your IDE to them. I hope that if you are using Windows OS then you will find this tool really helpful. 


Thanks for reading and pleaes leave comments in the section below. Until next time!


Managing Multiple Sotware Development Kits Using SDK Man!


Background

I once wrote a Java Shell Script that switches among the Java versions on my machine. The nice thing is that it worked well. Even shared it across the dev team and it worked like a charm. The pain come when I wanted to do the same with other tools ... i.e Maven; Kotlin; Kscript; Groovy & Gradle to name a few.

This would require regular maintenance on the script which would at some point require more and more time, while one needs to take care of real software development matters. I spend a lot of time on Unix based OS like working on Mac OS and you find that the organisation is hosting on Linux OS so I needed something that could work for both, something more flexible.

After some research I then learned about SDK Man! Which simply means Software Development Kit Manager.


What is SDK Man?

As hinted above this is Software Development Kit Manager. This tool helps with management of various tools in a simpler, cleaner and central place. One can manage all this in a parallel manner. As a company you will not have to worry about setting a standard from scratch. Think of standards like paths and directories. One developer saves their maven in folder x/y/z and the other one is /a/b/c ... now this could be hard to maintain and support. SDK Man will sort out all this in one directory out of the box.


Why Was SDK Man Introduced?

As a developer you deal with a lot of versions of one tool or you deal with various tools at once. Switching versions of the same tool and getting up and running with a different tool take up a lot of time and SDK Man was made to relieve you from all that effort. Things like setting up your JAVA_HOME path or GROOVY_HOME path can be quite an exercise. At times you find that one projects uses Java 8 and another one uses Java 14 and switching between the two requires a little bit more work. You either write a script to do that for you or you work with some like jEnv ( Java Environment ) , but as the name suggests, this is only for Java. Imagine if you could do this for other SDKs!


Getting Started.

For Windows OS can use Cygwin then for Unix platforms to install SDK Man is easy. For Windows OS I would rather use something else instead of SDK Man so tune into my next article coming soon! So start up your terminal to get started. Type the command : 


# Command to download SDK Man
curl -s "https://get.sdkman.io" | bash
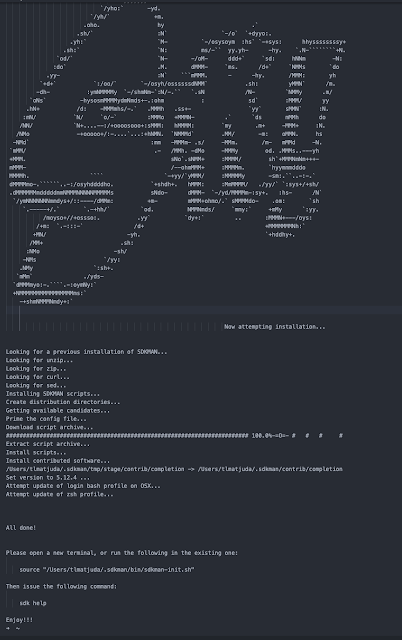

SDK Man Installation Results


The screenshot above gives you an idea of how things should be. And that's simple as that. Take note of the dependencies that SDK man is looking for before installing.

We can run a few checks to see if SDK Man is really installed. Let's check the SDK Man version by running the command :


# Checking SDK Man Version
sdk version
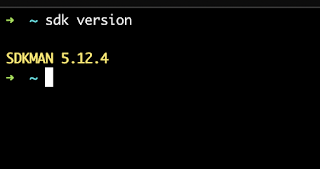

SDK Man Version Check


The Actual Works

So now that SDK Man has been installed let check out how it works. We will go through a few short cases. 
 

  • We want to see all supported candidates in SDK Man to see what is offers.

    # Checking All Supported Candidates aka SDKs
    sdk list


    SDK Man Supported Candidates or SDKs


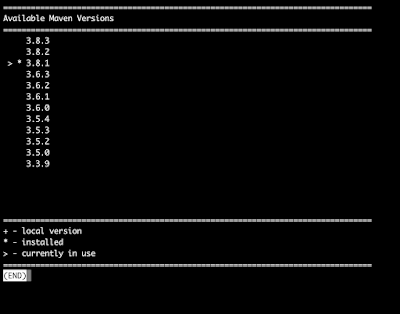
  • So now you have spotted something you want to install and want to check the versions first before installation. In my case I will pick maven. So let's see what versions are there :

    # Checking All Candidate Versions ( Maven in this case )
    sdk list maven


Supported Maven Versions On SDK Man

SDK Man is giving us a guide on which maven is installed on my machine. It's also showing what we wanted to see, which is all version supported on SDK Man. We also get to see which maven verion is in use on my mahine. So this is a good guide when working with a tool like SDK Man and multiple version of the same tool, in this case maven.


  • I have now decided that I want to install maven 3.8.2 and I install it as follows:

    # Checking All Candidate Versions ( Maven in this case )
    sdk install maven 3.8.2


    SDK Man, Maven Installation


Yes, it's correct that SDK Man asks you if you want to make the version you have just installed, the main one. So SDK Man has spotted that there are more than one versions of Maven installed and is asking if I want use the one I have just installed as the main one. I will chose "No" so that we can do that later.


  • Let's see all the maven sdks I have SDK Man, Maven Installation
    # List Maven Versions
    sdk list maven


    SDK Man, Maven List

We can see all the installed maven SDKs on the machine from the image above. I am using maven 3.8.1 on the machine and I have also installed 3.8.2. So let's see how to set a new version for the terminal session only or on the entire machine permanently. 


  • Setting maven in the current active terminal session. So in other ways we are setting it, temporarily :

    # Temporarily set maven
    sdk use maven 3.8.2


    SDK Use Maven ${Version}


  • Setting maven permanently, so this will not be in the current termianl session only :

    # Permanently set maven
    sdk default maven 3.8.2


SDK Default Maven ${Version}


  • So you want to be explicit when checking the current maven that's beng used :

    # Check current version in use
    sdk current maven


    SDK Current Maven

  • Now you decide that you are no longer using the older version of Maven so you want to remove it :

    # Check current version in use
    sdk uninstall maven 3.8.1


    SDK Uninstall Maven

Well done to you, now you understand SDK Man! You are wondering how you can point your IDE to these SDKs because so far you have just been using the terminal. So close up this article with that. So if you go to your home directory /Users/${yourname}/.sdkman aka ${HOME}/.sdkman, then you will find the SDK Man folders in there. So you want to use a specific JDK for your Java project, then look into the "candidates" folder because that's where all the SDKs are.


SDKs Home


So you can choose the version that you want, as shown in the image below.
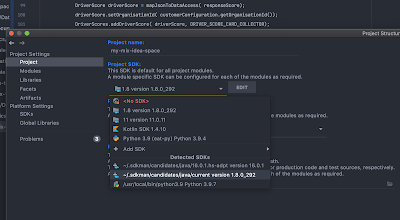

IntelliJ IDEA IDE Using SDK Man Java


I hope you have enjoyed this article and this will help you. Leave comments in the section below and let me know your thoughts. Thanks!